
REQUEST A FREE ESTIMATE!
Smart Transfer 8 Proven Ways to Move Products Between Conveyors

Smarter Conveyor Transfers: 8 Proven Ways to Move Products Between Conveyors (Without Jams or Damage)
Moving a product from one conveyor to the next sounds simple—until you’re dealing with small items, soft packs, unstable cartons, high speeds, or tight layouts. A poor transfer point can cause tipping, product scuffing, trapped items, spillage, or recurring jams that slowly kill your OEE. Below is a practical guide you can use when designing or upgrading a line—written for manufacturers who want reliable transfers, not “it works most of the time.” It expands on common transfer styles and adds selection tips so you can choose the right method for your product and factory.
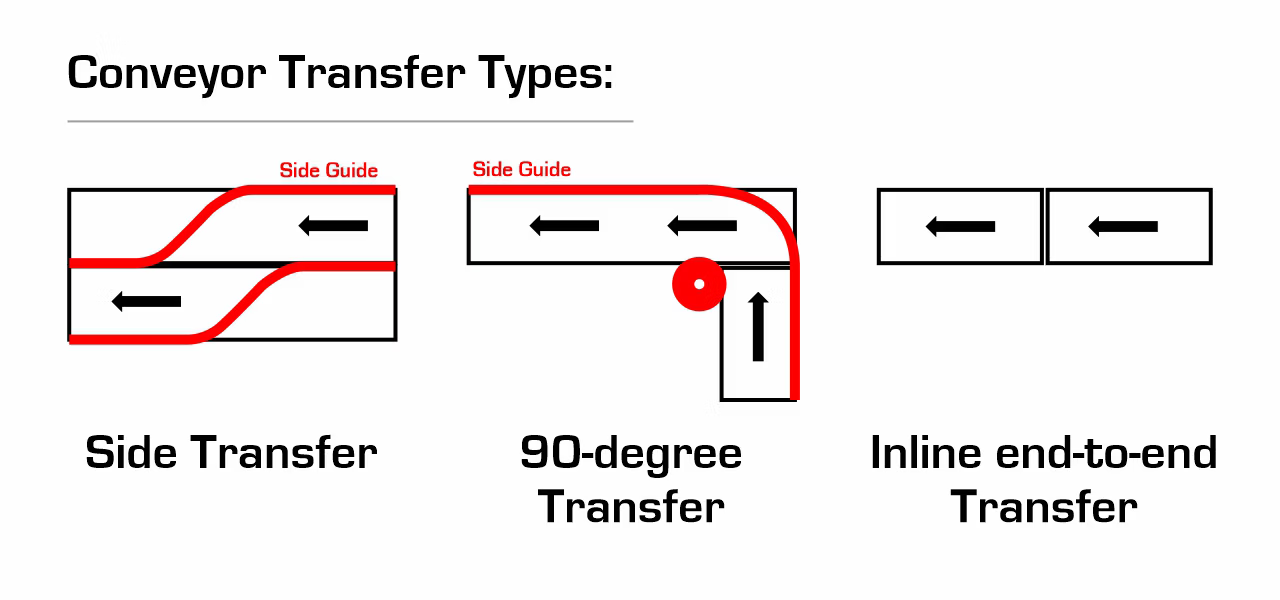
Start with the 5 “core” transfer methods
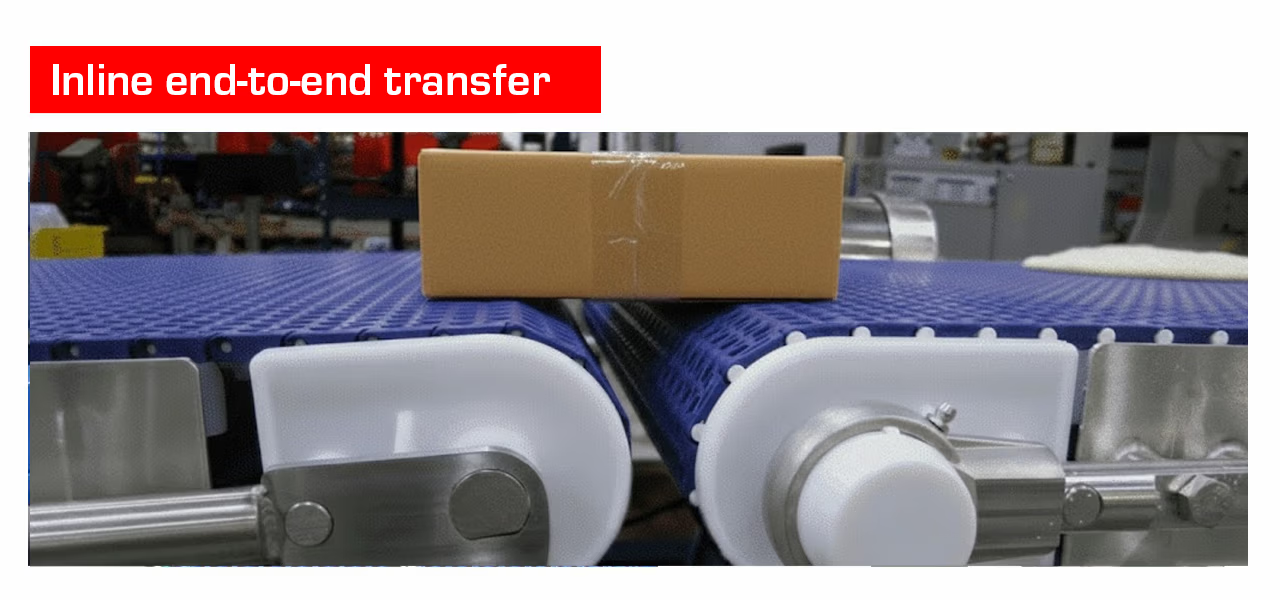
1) Inline end-to-end transfer (straight conveyor-to-conveyor)
This is the most common approach: one conveyor discharge butts up to the next conveyor in the same direction. It’s compact, cost-effective, and easy to maintain—but only if you manage the gap, height match, and product stability.
Best for: rigid cartons, trays, totes, and products with a stable base. Watch-outs: small parts can fall into gaps; unstable packs can nose-dive if the transition isn’t tight.
Practical tips
- Match top-of-belt height precisely (even a few mm matters at speed).
- Add side guides if products wander laterally.
- If your product is small or soft, consider a tighter method like a nosebar.
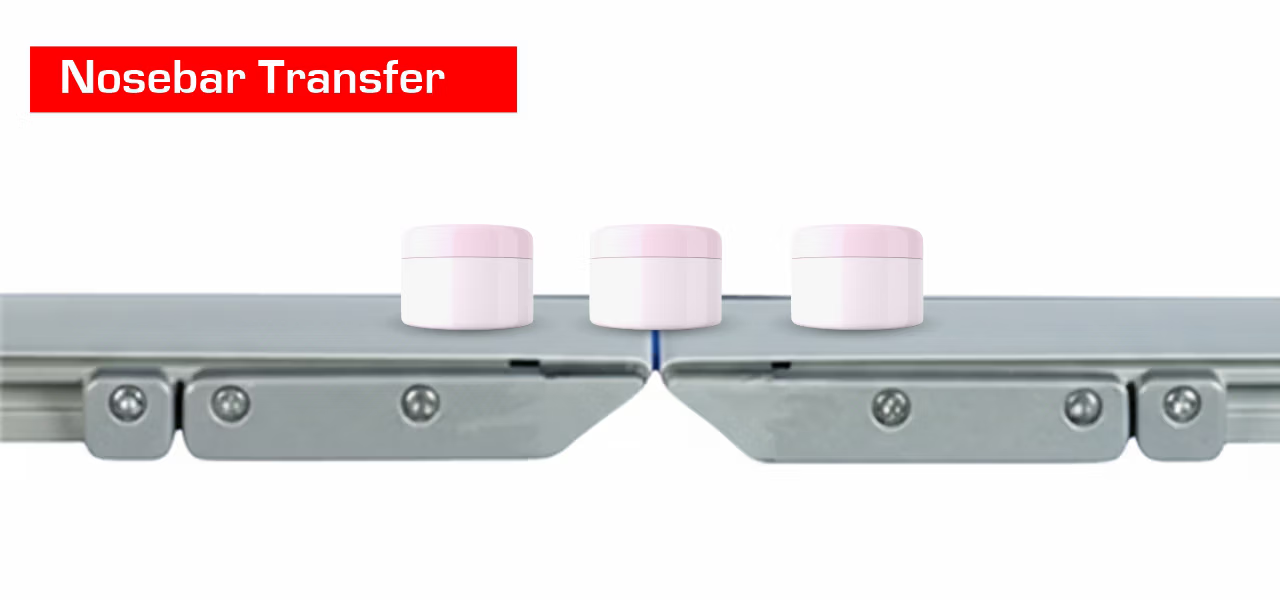
2) Nosebar transfer (tight-gap transfer for small products)
A nosebar uses a small-diameter end roller/pulley to reduce the gap dramatically, helping small or unstable products bridge the transition. Some modular belt options can achieve very tight transfers (as small as about 0.31 in / ~8 mm in one example).
Best for: small components, sachets/pouches, short cartons, small packaged goods. Watch-outs: setup accuracy matters; if misaligned, small products can still snag.
Practical tips
- Keep belt tracking tight and frame alignment accurate.
- Combine with hold-downs or a short transfer bridge for ultra-light items.
- If you’re handling very fragile products (like empty cans), tight-gap setup can significantly reduce transfer issues versus larger-gap dead plates.
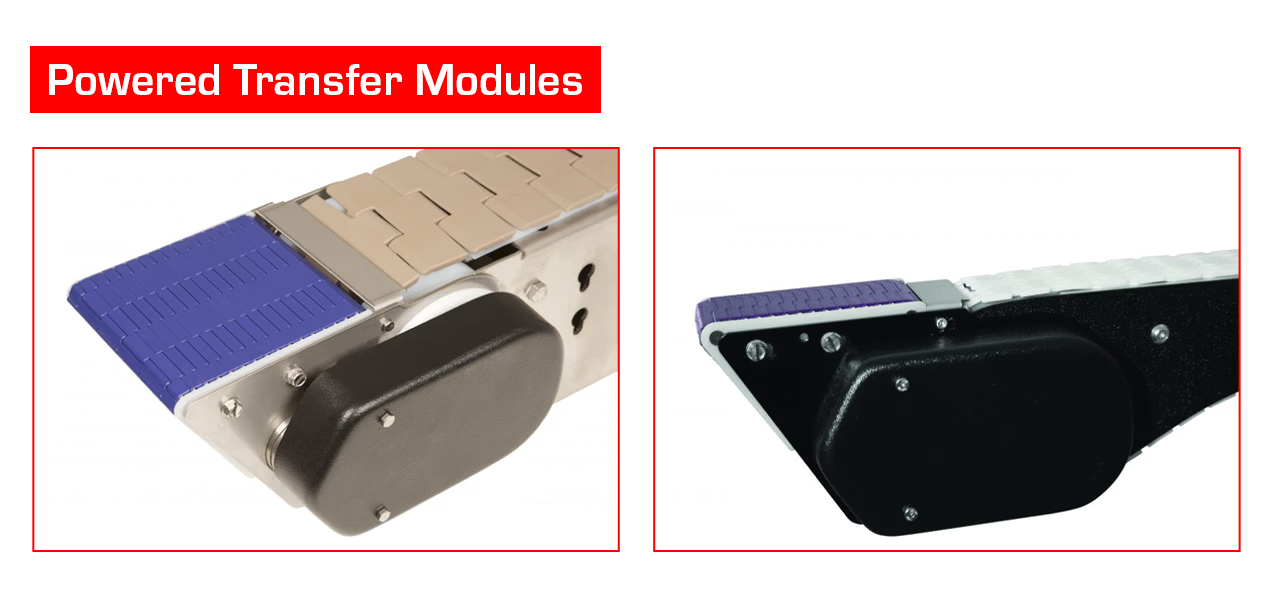
3) Powered transfer modules (built-in powered transfer sections)
Powered transfer modules are designed to keep the product moving smoothly across a transfer point while maintaining speed and motion, often used on chain conveyor platforms. They can be ideal when you need consistent movement but don’t have space for bigger transfer hardware.
Best for: compact machinery interfaces, small parts, space-constrained lines. Watch-outs: requires correct drive integration and maintenance discipline.
Practical tips
- Use this when the transfer point must “behave like one continuous conveyor.”
- Great where you want smooth movement without long accumulation zones.
4) Side transfer (from belt edge to belt edge)
Side transfers move the product laterally from one conveyor to another (typically parallel conveyors). The key is having conveyor frames/ends that don’t block the side movement.
Best for: lanes, gentle repositioning, certain inspection/reject layouts. Watch-outs: frame protrusions, side rails, or supports can interfere.
Practical tips
- Confirm the mechanical design supports side movement (clear frame edges).
- Add guides to prevent the product rotating during the side shift.

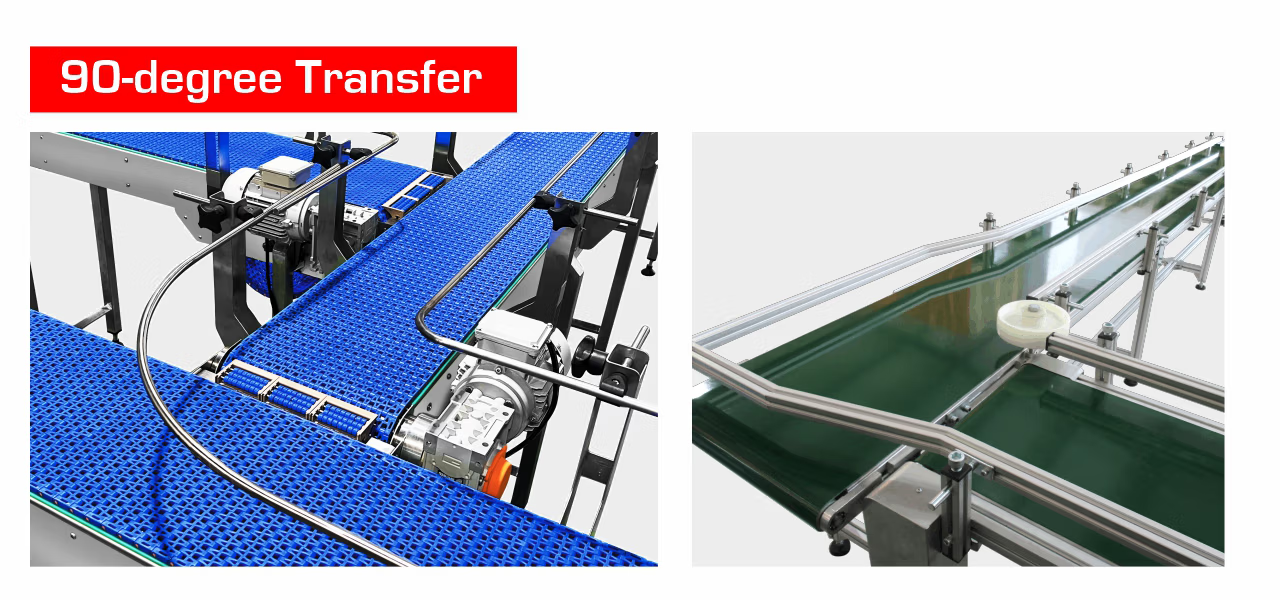
5) 90-degree transfer (simple right-angle transfer)
A classic low-cost method: product transfers from the belt edge to the frame edge onto a perpendicular conveyor. Speeds should be close, but don’t have to be perfectly matched for many stable products.
Best for: cartons/totes moving to a new aisle or workstation. Watch-outs: very small items can catch; unstable items may rotate or tip.
Practical tips
- Use for “easy wins” where product size and stability allow it.
- Add a short dead plate or transfer corner only if needed (see below).
Now the “extra” methods that often make a line much more reliable
The five methods above cover a lot, but many factories get better uptime by adding one of these proven transfer aids.
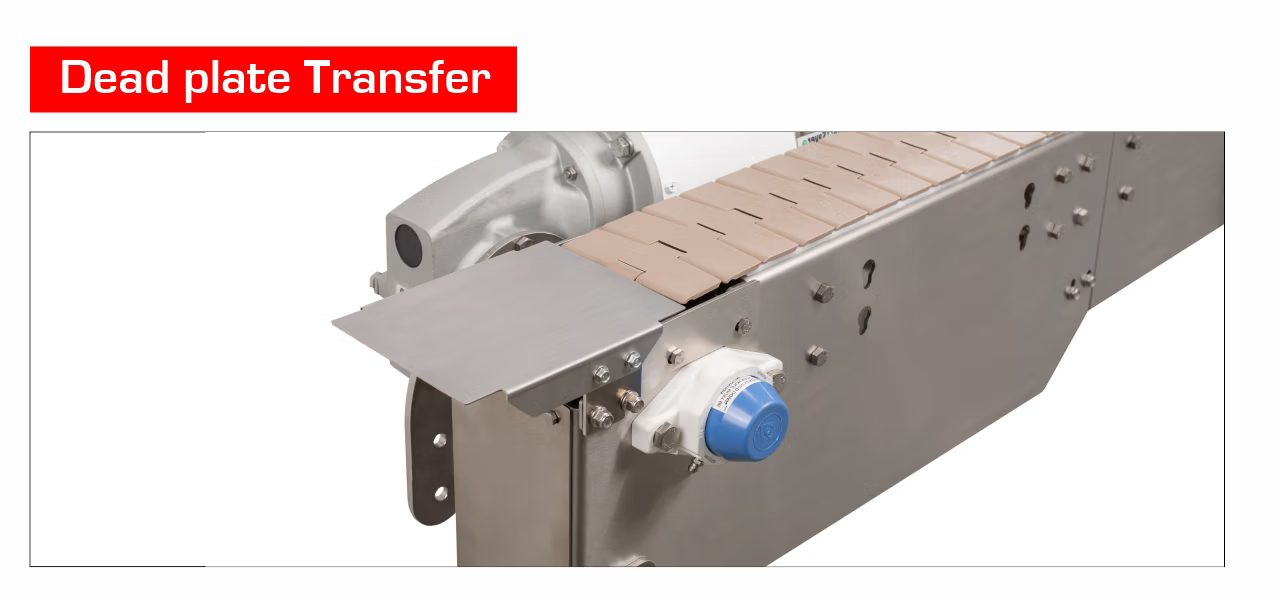
6) Dead plate / transfer plate (simple bridge across a gap)
A dead plate is a stationary plate that bridges the gap so products slide across instead of dropping into the space. It’s widely used because it’s cheap and simple.
Best for: stable, rigid items at moderate speeds. Watch-outs: friction/scuffing; not great for sticky items or soft packs; can trap debris.
Practical tips
- Common materials include metal or low-friction plastics like UHMW (often used for wear surfaces).
- Consider engineered/segmented plate solutions to reduce downtime when debris gets caught.
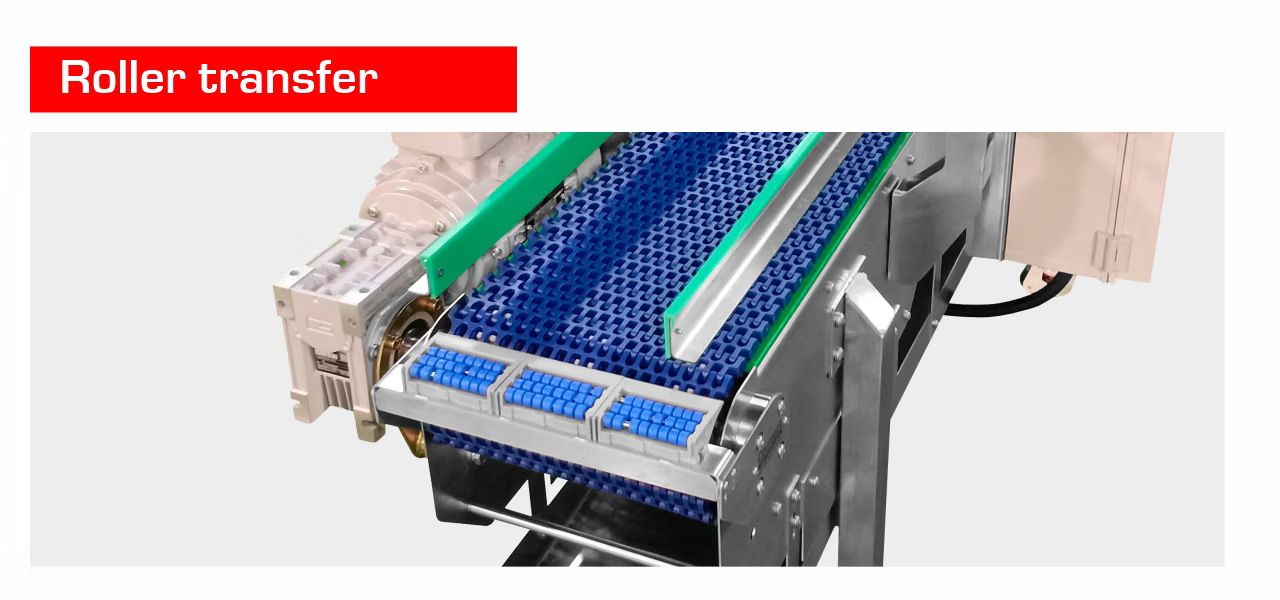
7) Roller transfer / transfer rollers (reduce friction at the transition)
Instead of sliding across a plate, products roll across a small roller section. This reduces friction and helps heavier cartons or totes transition smoothly. Many “transfer plate + roller” combinations are used to stabilize the handoff.
Best for: cartons, totes, heavier packages. Watch-outs: very small products can still drop between rollers; not ideal for unstable tiny parts.
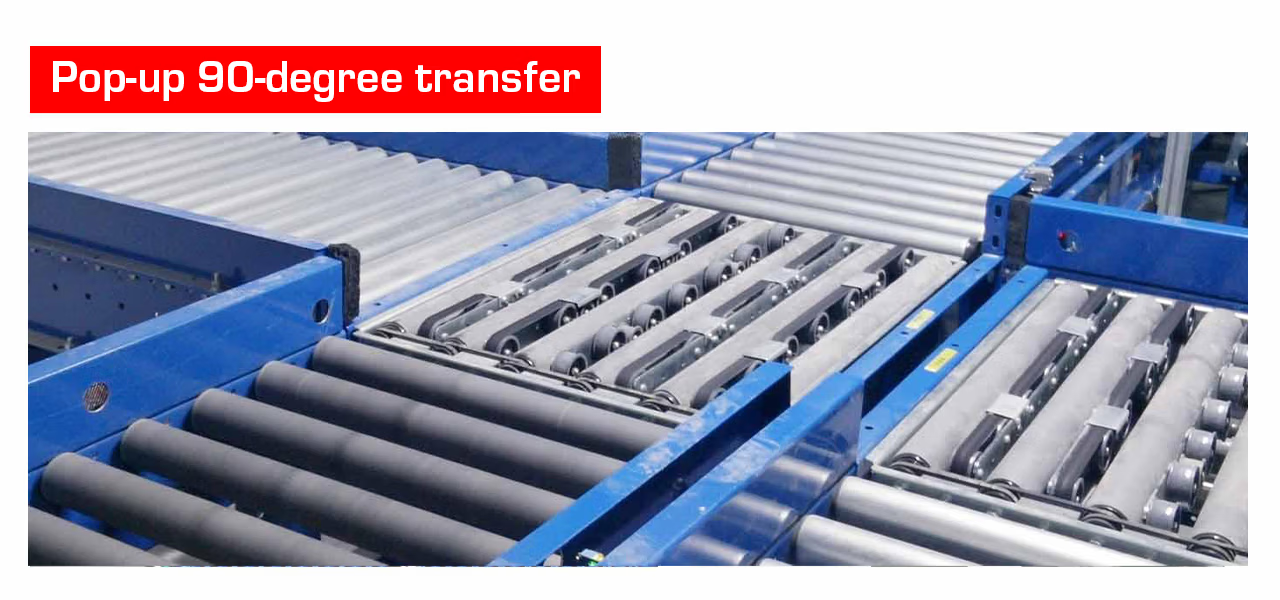
8) Pop-up 90-degree transfer (powered right-angle diversion on demand)
If you need a controlled, repeatable right-angle transfer (often for routing/sorting), a pop-up transfer uses rollers that lift up from a recessed section and push the product sideways into an orthogonal line.
Best for: routing cartons to different lanes, inspection/rework loops, sorter infeed. Watch-outs: needs controls integration (sensors, timing) and clean pneumatics/electrics.
How to choose the right transfer (quick decision checklist)
When Connect Automation helps customers select a transfer, we usually start with these questions:
1. What’s your product’s “transfer risk”?
- Small footprint? Lightweight? Flexible pack? High center of gravity? → favor nosebar, powered transfer modules, or a purpose-built transfer.
2. What’s the speed and throughput?
- Higher speed = smaller errors become big problems. Tight-gap transfers and guided transitions become more important.
3. Can the product tolerate sliding friction?
- If scuffing is unacceptable, avoid dead plates or specify low-friction materials and gentle geometry.
4. Do you need routing or just a clean handoff?
- Routing/diverting = pop-up transfer, diverters, gates, or controlled right-angle methods.
5. What’s the maintenance reality?
- Dusty/dirty environments: avoid designs that trap debris; prefer self-clearing or easy-access transitions.
Common transfer mistakes (and how to avoid them)
- Unmatched heights → creates a “step” that catches product edges.
- Oversized gap → causes small items to fall or tip. Tight transfers reduce stranded product risk.
- No guiding on unstable products → drifting leads to corner catches and jams.
- Ignoring debris → transfer points are debris magnets; choose designs that don’t trap contamination.
The takeaway
Transfers are where conveyor lines win or lose reliability. The best solution is rarely “one-size-fits-all”—it’s the method that fits your product geometry, speed, hygiene requirements, and maintenance capability. If you tell us your product size, weight, material (rigid vs flexible), target speed, and whether you need routing/sorting, we can recommend a transfer layout that reduces jams and product damage—and keeps your line simple to run. (If you want, paste your product dimensions + a rough layout sketch, and I’ll suggest 2–3 transfer concepts that fit your situation.)
Connect Automation specializes in providing automation solutions, including conveyor systems, to improve efficiency across various industries. The company delivers cutting-edge technology to help organizations automate tasks and optimize workflows. Connect Automation helps businesses reduce manual efforts, boost productivity, and achieve better outcomes. With a customer-focused approach, the company designs tailored solutions to ensure smooth and effective automation transitions for long-term success.
Kawasan Industri Jababeka Tahap 1, Jl. Jababeka II D Blok C14L Cikarang, Indonesia (17530)
(021) 893 5060 Google Maps
Rungkut Industri III, No. 37, Rungkut Menanggal, Kec. Gn. Anyar Surabaya, Indonesia (60293)
(031) 9985 8624 Google Maps